MedWand KIOSK Guide

MedWand KIOSK Guide

MedWand KIOSK Interface Guide

This guide provides a high-level overview of the MedWand KIOSK software and interface, which is used by non API integrated customers for managing MedWand Exams and their accompanying results. For detailed guides by exam type, please navigate to the links below.
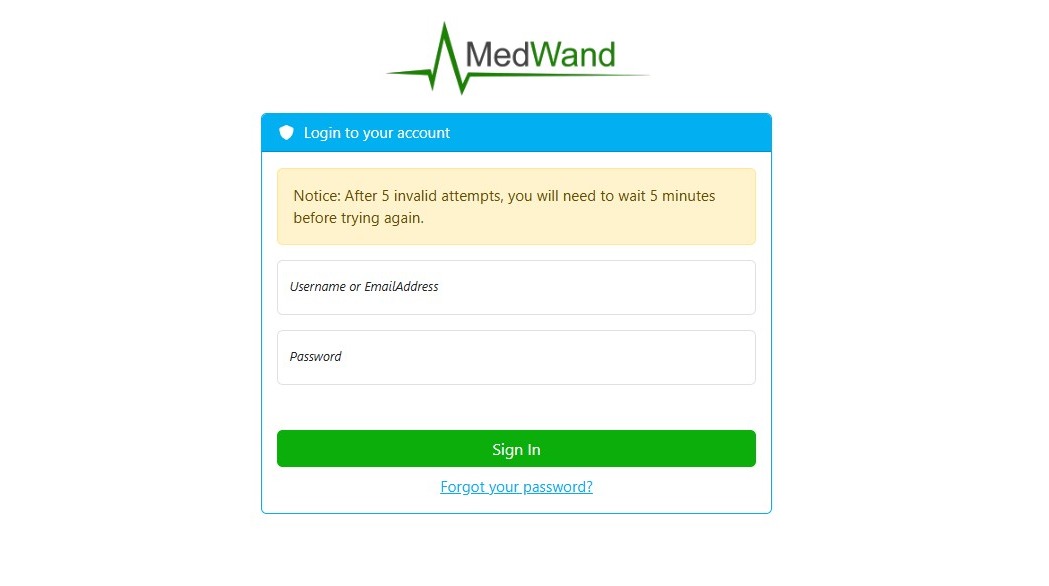
Step-by-Step Guides


Login Page

Navigate to https://portal.medwand.com and login using your provided credentials.


Home

Info
This page is visible to all user types. Users with the Assistant role will only see the Create New Exam Appointment button.

Upon logging into your KIOSK Portal, you will be presented with the home page. This page has two quick-access buttons for commonly used functions.

  • Create New Exam Appointment - Navigates immediately to the exam creation wizard without needing to first open the Appointments page.
  • Provide Remote Exam Assistance - Navigates to the Remote Exam Assistance entry page. This functionality is exclusive to the OnSite exam type and is used by a remotely connecting clinician to convert your OnSite exam to a full audio/video telemedicine visit. (The clinician will need to be provided a six-digit code to join the exam. This code is generated when the patient or OnSite staff taps the invite button in the MedWand app).
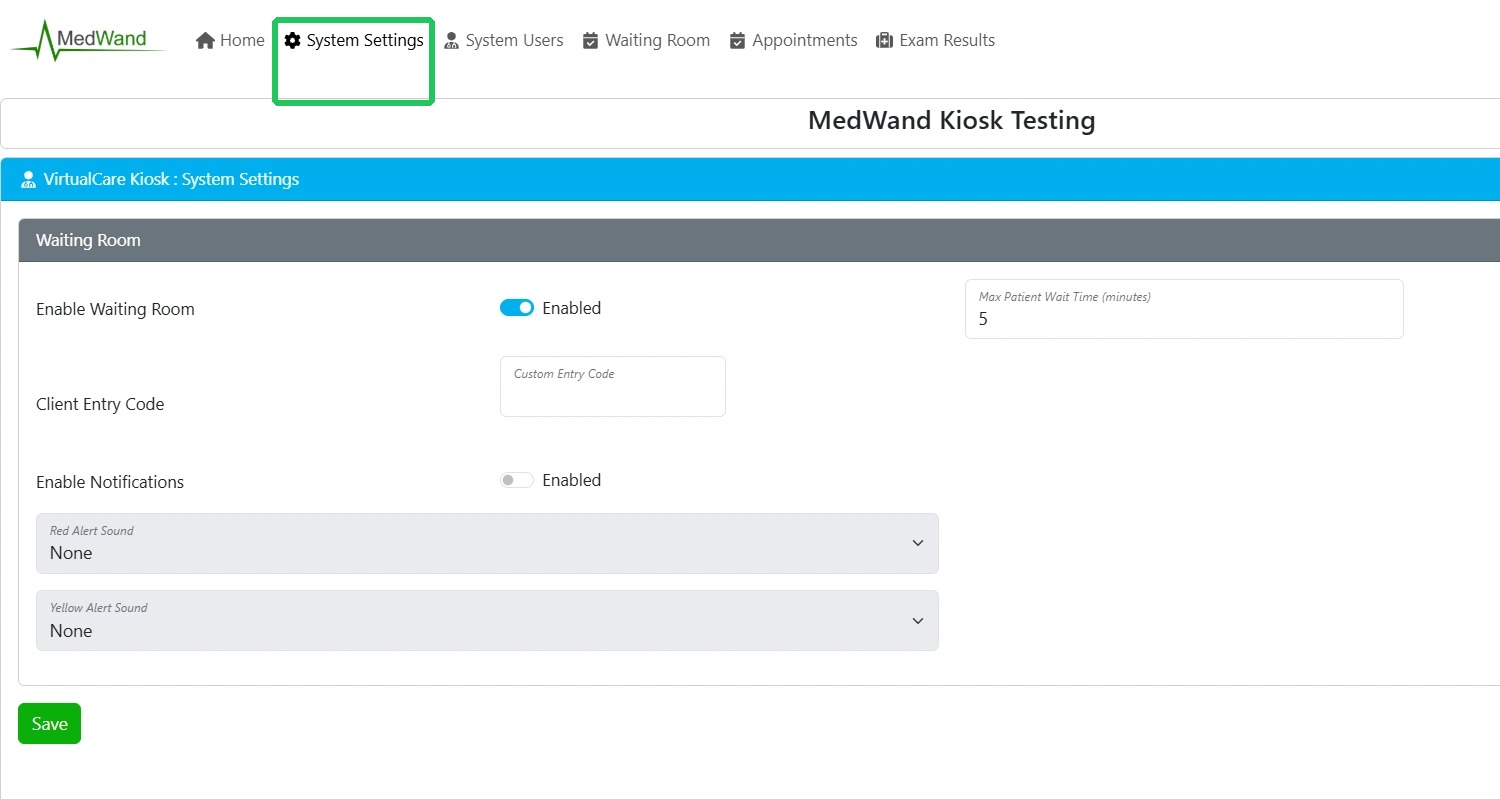


System Settings

Info
This page is only visible to users with the Manager role.

The System Settings page contains several tools that can be used to enable or disable specialized functionality for your KIOSK account. Be sure to hit SAVE in the bottom right corner after making any changes to this page.

  • Enable Waiting Room - This toggle switch allows you to enable or disable the Waiting Room functionality for your account. The waiting room will be covered in more detail later in this guide.
  • Max Patient Wait Time (minutes) - This field allows you to customize how long a patient must be waiting alone in an exam room before their waiting room status changes from the standard yellow alert to red alert.
  • Client Entry Code - Allows you to set the Client Entry Code. This field only applies to customers who have had a custom MedWand KIOSK implementation developed that replaces the unique six digit exam join code with a static passcode format.
  • Enable Notifications - This toggle switch allows you to enable or disable audio alerts to notify you when a patient has joined a remote exam and is waiting for a clinician to join. (Audio notifications will only play if you're on the waiting room page)
  • Red Alert Sound - This dropdown is used to set a notification sound for the "Red" alert status.
  • Yellow Alert Sound - This dropdown is used to set a notification sound for the "Yellow" alert status.
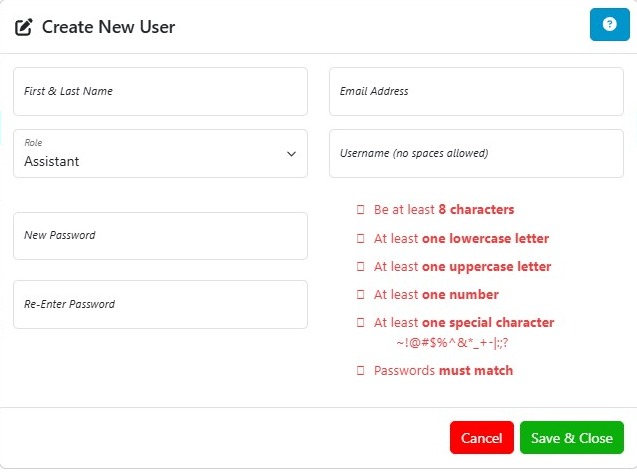

System Users

Info
This page is only visible to users with the Manager role.

The System Users page allows Managers to create and manage logins for staff members and clinicians using the KIOSK Portal.


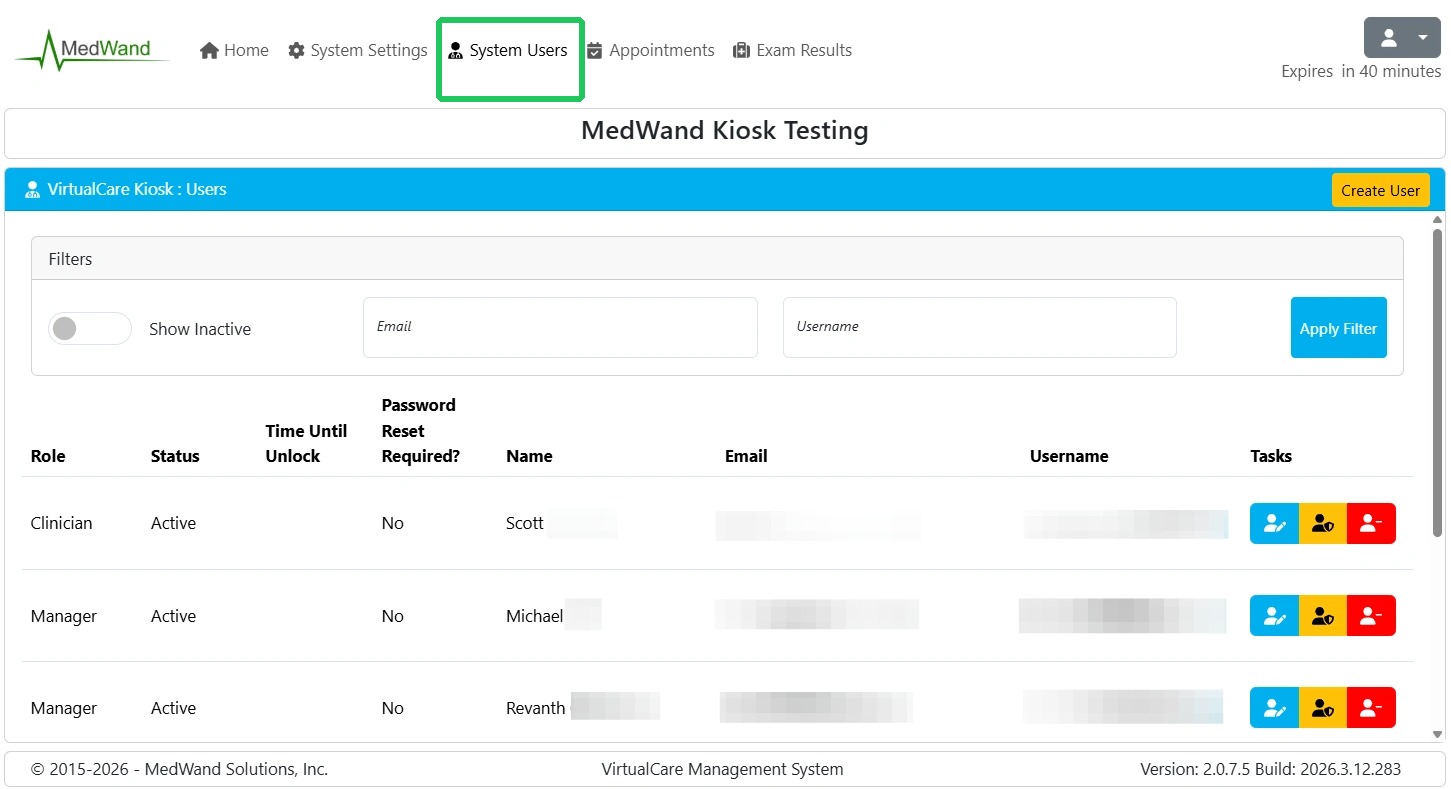
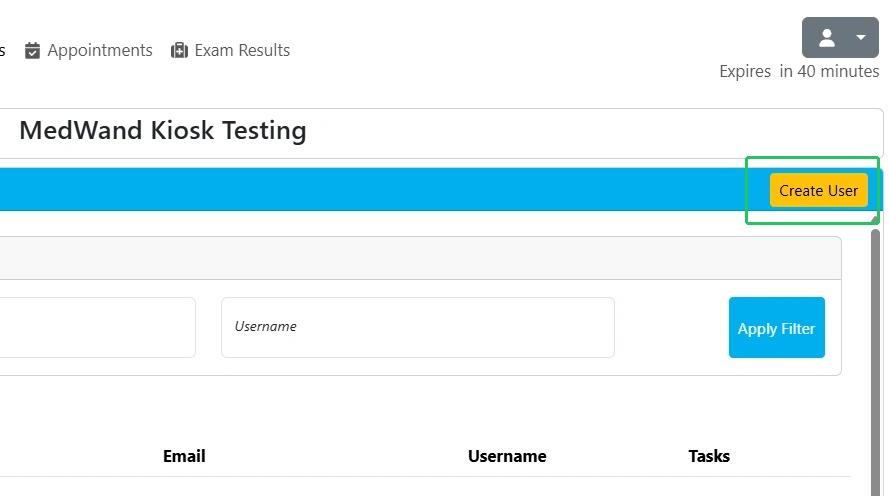
Select Create User in the top right to open the new user wizard.


Fill out the displayed fields. If needed, select the question mark in the top right for a list of permissions by role. Select "Save & Close" to create the new user.

Note: The username can be either an email or an alphanumeric name.

The Filters tab can be utilized to search for a specific user by email or username. You may also toggle on "Show Inactive" to display any users that have been deactivated. This is useful if you ever need to re-enable a user who has been previously disabled.

Each user entry contains 7 columns of information and a tasks menu. Below is a description of the information contained in each.

Role - Lists users currently assigned role.

Status - Lists whether the user is active or inactive.

Time Until Unlock - Lists the time remaining until the user's login will be unlocked. If a user enters invalid login information 5 times on the Portal login page, they will be locked out for 5 minutes. This lockout can be lifted prematurely by selecting "Forgot Your Password?" on the login screen and successfully resetting your password. A manager user can also set a new password for the user by selecting the yellow set password icon under the Tasks column.

Password Reset Required - Indicates whether a password change will be required upon the user's next login. 

Name - First and last name set at account creation.

Email - Email address set at account creation.

Username - Username set at account creation.


The tasks menu to the right of each user entry includes the following 3 options.

Edit
 Edit - Allows a manager to edit a user's Role, Name, Email, or Username.


Set Password
 Set password - Allows a manager to change a user's password.


Deactivate User
 Deactivate User - Allows a manager to completely deactivate a user. Deactivated users are not able to login to the portal and are kept in a read-only status for reporting purposes.


Activate User
 Activate User - This option is only visible on deactivated users and allows the manager to reactivate their login. You can see a list of inactive users by toggling the "Show Inactive" switch in the         filters box.


Appointments

Info
This page is visible to ALL user roles.

Select Appointments in the top navigation bar.


Select Create Appointment in the top right to open the appointment creation wizard.


Fill out or select an option for all 4 fields

Appointment Type - Select the type of appointment you would like to create. (If needed, click the help symbol (?) for a description of each appointment type or CLICK HERE)
Clinician - Select the clinician for this appointment. This field is only for organizational purposes. Anyone with access to the appointments page can join this appointment as the clinician.
Patient Identification (optional) - Enter the desired patient identifier for this appointment.  This field is optional; we strongly recommend entering one so that the appointment can be easily identified. MedWand is SOC 2 and HIPAA compliant, so full names can be entered if desired. 
Time and Date -  The time and date for the appointment is set to the current time and date at appointment creation. This field is for organizational purposes if your office schedules many appointments and would like an ordered list. 

Select Save and Close in the lower right corner when done.


Upon creating the appointment, you will be presented with a splash screen containing the six-digit code that must be provided to the patient or staff member launching the exam on the tablet. This page can be closed as the code can be referenced at any time from your appointments list.  You can also print the page or copy the code to your clipboard if you're ready to paste it in an email, chart note, text message, etc., to the patient or staff member with the tablet.


Upon closing the exam code window, you'll be presented with your Appointments page. Just above your appointments list, you'll find a Filters box that can be used to sort your appointments list by Exam Type, Scheduled Clinician, or Patient Identifier.  The Only Mine toggle can be used to only display appointments scheduled with the currently logged-in user. 


Below the filters box you'll find your list of scheduled appointments. Each appointment will display 6 columns of information.

Code - This is the six-digit exam code used by the patient or staff member on the tablet to launch the MedWand exam. 
Type - Exam type scheduled.
Patient - Patient Identifier entered at exam creation (if any).
Clinician - Clinician scheduled at exam creation.
Scheduled Date - Date and Time scheduled at exam creation. By default this value is the time the appointment was created if no custom date and time is selected during exam creation. 
Tasks - Control buttons used to perform various functions (see guide below)


Your Task options will vary depending on the exam type scheduled.  Below is a list of all possible options. 

 - Used to join a Remote Exam as the clinician. This button will launch the web-based exam room in a new tab.

 - Opens the Appointment Join URLs window. These URLs are only relevant to Remote Exams and allow the clinician or guest to be sent a direct URL to join the exam.
   Note: Guests can only join an exam via the provided URL. Clinicians can join either by URL link or through the Join button in the portal. 

 -Opens the Exam Code splash page. This page can be used to print or copy the exam code.

 - Open the exam editor. From here you can make any desired changed to the scheduled Appointment Type, Clinician, Patient Identifier, or Date and Time.

 - Allows you to delete the scheduled appointment entirely. This process cannot be reversed and causes the join code to be invalidated as well.


Exam Results

Info
This page is visible to users with the Manager or Clinician role.
WarningNote: The MedWand Kiosk only stores exam results for up to 30 days after exam completion. If results need to be stored for a longer period of time, please use the download options referenced later in this article to save them to your computer or server.

Click Exam Results in the top navigation bar. This will present you with an ordered list of completed exams.


In the top right corner you will see an option to Export Exams. This button can be used to export all available data from the page to an Excel file.  

Note: This report does not contain vitals data. It only presents information for analytics and usage reporting, such as Patient Identifier, Clinician, Device Used, Runtime, etc. Continue for instructions on reviewing and or downloading vitals data for each exam. 


Just above your appointments list, you'll find a Filters box that can be used to sort your appointments list by Exam Type, Scheduled Clinician, or Patient Identifier.  The Only Mine toggle can be used to only display appointments that were scheduled with the currently logged-in user. 


Below the filters box you'll find your list of completed appointments. Each appointment will display 6 columns of information.

Code - This is the six-digit exam code used by the patient or staff member on the tablet to launch the MedWand exam. 
Type - Exam type scheduled.
Patient - Patient Identifier entered at exam creation (if any).
Clinician - Clinician scheduled at exam creation.
Scheduled Date - Date and Time scheduled at exam creation. By default, this value is the time the appointment was created if no custom date and time is selected during exam creation. 
Tasks - Control buttons used to perform various functions (see guide below)

 Results - Displays a page containing all vitals collected during the exam. 


 Delete - Allows the user to manually delete the exam results from our server.  Warning: This process is irreversible. Use with caution.  


 Download - Opens the download options for saving exam results. The MedWand Kiosk only displays exam results for 30 days past exam completion (See download options below).


Kiosk Exam Results Download Options

Select Download as HTML File to save the exam in a raw HTML5 format that can be opened in a standard web browser.


Select Download as Image File(s) to save results as separate media files


On the displayed Exam Results Download page, select the green download button next to each vital you would like to save to a file. All files are saved in JPEG format with the exception of stethoscope recordings, which are saved as MP3's. 


    • Related Articles

    • Post-Training Reference Guide

      Below is a reference guide for post-training for quick access to relevant help material: Accessing Exams Patients and facilitators should not open the MedWand app directly to begin an exam (except when using Training Mode). Instead, all exams are ...
    • MedWand KIOSK - Creating and Joining a Remote Exam

      MedWand KIOSK - Creating and Joining a Remote Exam Below are written instructions to guide you through the process of creating a Remote Exam and the joining process from both the patient and clinician perspectives. Below are links to our video ...
    • MedWand KIOSK - Creating and Joining a Patient Exam

      Creating and Joining a Patient Exam Below are written instructions to guide you through the process of creating a Patient Exam within the MedWand Kiosk and providing your patient with the 6-digit code to join the exam. The Patient Exam type is ...
    • VirtualCare Kiosk Software Manual

      CLICK HERE TO VIEW THE USER MANUAL
    • MedWand KIOSK - Creating and Joining an Onsite Exam

      Creating and Joining an Onsite Exam Creating an Appointment 1. Navigate to https://portal.medwand.com in your Chrome web browser and log in with your provided username and password Note: We strongly encourage the use of Chrome as it's the most stable ...